
Gridley Company
by GridcoLindaContest received 18 entries and the contest holder has awarded a winner.
- BACK TO CONTEST ENTRIES
- CREATIVE BRIEF
- ALL ENTRIES
Company or website name
Gridley Company
Links to the website
www.gridleycompany.com
Describe your company and organization and target audience
Design/Build/Remodel
Residential Home Designing and Remodeling company
We need a double sided copy for client welcome kit (fits inside a three ring binder or will be used as a handout) that visually shows our clients the steps in our process so they can follow where they are as we move their remodel from design to completion.
The design should have the following
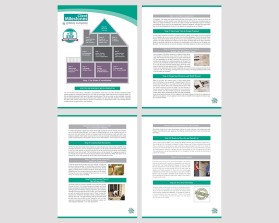
We call this flyer/brochure our Client Milestones...we are open to renaming. We have one example of a house, starting with the foundation and ending up with a complete project and a happy client or Warranty at the very top.
First document shows an example of house milestones but words are not correct. Should say Client Milestones plus the next document are the actual steps. We would like to stay with the colors on our brand and website: www.gridleycompany.com.
Here is the process we have for our clients. We would like a map with an overview (then we could attach a detailed word doc) or do a full brochure with all the words.
OUR DESIGN BUILD PROCESS
The entire Gridley Company family is dedicated to the satisfaction of each and every client. We take a collaborative team approach to design by incorporating expertise from many fields during the design phase when their input can best be utilized. We have well defined procedures for each step of the design and build process. This way our clients can take comfortable, incremental steps to achieving their goals knowing we are listening at each milestone. Our team treats each project with a hands on approach from start to finish. We are conscious that your home is an investment in your family’s future, which is why we always strive for excellence and to be a good return on your investment.
Step 1: In-Home Consultation
No Obligation. The Design-Build process begins with good communication. We will come to your home, ask pertinent questions, and listen carefully to your ideas and concerns. We’ll discuss your priorities and goals, as well as your budget considerations, so that we can create a complete and meaningful proposal for the design and construction of your home. Our first meeting doesn’t require any obligations. If we seem like a good match, then we will take photographs and invite you to our showroom to introduce you to your Designer! (picture of couple meeting with Linda)
Step 2: Showroom Visit & Design Proposal
A written Design Agreement will follow a successful showroom meeting. At this meeting you will be introduced to your Designer, we will go over your goals and review the before photographs. We will discuss the Design Process, review photo-realistic renderings and show you some examples of projects that are similar to your requests. The Design Agreement will include a list of your goals, the design steps we will follow, information pertaining to ballpark costing and its importance in guiding design, and a fixed cost for the design work described. If we’ve all done our job well, the information in the Design Agreement will offer a path to solutions. (3D rendering from computer)
Step 3: Schematic Design Phase To Create A Design That Is Uniquely Yours
Upon acceptance of the Design Agreement, we begin the design phase. Your Designer will meet you at your home with one or more of our design team members to review the goals of your project. Measurements and more photographs will be taken, issues that may arise during the process will be identified, and additional questions will be asked. Our goal is to produce schematic concepts for each area and present these to you over the course of several meetings helping narrow the overall scope to determine the best design direction. The design is developed further until a collaborative plan has been established and we arrive at the conceptual estimate for the construction cost. Once the design and budget are in sync we move to the Design Specification phase, where all the fine details are completed. (Blueprints with radius drawing)
Step 4: Design Specifications and Build Manual
Based on your goals, we'll create a custom 3-D photo-realistic design with all the finishes as they are selected. A detailed Scope of Work will outline everything included in your project, along with the associated costs for your remodel.
Every detail is planned from the start to keep your project running on time and on budget. The Build Manual will have all your product selections and elevations laid out in advance to include: cabinetry, tile, stone surfaces, appliances, plumbing fixtures, windows, doors, flooring, accessories and paint colors.
After considerable review of the design documents with the integration of the chosen material finishes and the exploration of different pricing options, with your approval, we are ready to complete final pricing and are ready to sign the Construction Contract.
Step 5: Construction Contract and Pre-Construction Meeting
A Construction Contract is signed and a home walk-through is scheduled with the necessary team members who will review the project first hand. You’ll meet your Project Manager who will be overseeing the work on your home from start to finish. He/she will discuss things like communications, health and safety, dust protection, dumpster/trailer location, access to the home, lock-up procedures, schedule details, and a variety of other important aspects of the process so that you have a clear expectation of how things will be managed. (Calculator and contract)(Team looking at plans)
Step 6: Construction Documents
With the floor plans and material finishes finalized, we review the plans once more and begin completion of the construction documents. They’ll be reviewed by the engineer, and the design-build team before being submitted to the City for plan approval and permits.
During this time we are finalizing your Build Manual that is designed specifically for your home remodel. The Build Manual serves as the “go to guide” for managing every aspect of your remodel and renovation including the product selections and all architectural details. This manual will be reviewed with you for both parties to sign off and make sure all the details are correct.
Step 7: Order Finish Materials and Your Preparation
During the waiting period for plan review and approval, we begin the process of ordering materials. To facilitate faster construction timelines, now is the opportunity to order long lead-time materials such as cabinets, lighting, plumbing fixtures, windows and doors.
At this stage you are strategizing your move out and organizing the logistics of the remodel. Clearing the area of your belonging and figuring out how you will live without the room(s) we are remodeling.
Step 8: Construction Phase I: The Infrastructure
The Gridley Team will oversee all aspects of the construction process from start to finish. This includes managing the budget, securing all permits, selecting and coordinating employees and trade contractors, ordering product and materials, arranging inspections, and scheduling deliveries.
Once the building permits are in place, your Project Manager will verify the schedule and construction start. In Phase I we start with deconstruction, followed by foundation, framing, windows, plumbing, electrical, and HVAC. This gets everything under the floors and behind the walls ready, then we have our work inspected by your city. After inspection we complete insulate, followed by sheetrock or plaster with more inspections depending on your cities requirements.
Step 9: Construction Phase II: The Finishes
With all the infrastructure in place we complete installing trim, doors, cabinetry, hard surfaces and other finishes. This is followed by paint, appliances, final cleaning, punch list, and move-in (just not quite that fast)! (tool bags)
Step 10: Ready to Move In and Punch List
When it comes to the final details of your remodel, the difference between good and excellent is determined by how well the last 10% of the project is managed. At Gridley Company over 30 years of experience have proven that our commitment to completing every detail is what sets us above and apart from others in our industry. At this point your home will be ready for you to move into your new space. We may have a few items to complete like missing pieces on backorder, a damaged part that is being shipped, etc. We will organize the list of items that need attention so we can successfully get to 100% completion. We meet, review the list, and provide a schedule for completion.
Step 11: Project Complete
Final walk-through is one of our client's favorite steps in the process! Since our primary goal is to exceed your expectations, this step is the most important. Your Project Manager and Designer will walk you through the work completed and answer any final questions you may have.
Now it’s time to enjoy your new and improved home, so we want to take the mystery out of home ownership. For many, their home is the biggest investment they will ever make, so why doesn’t it come with an Owner’s Manual? Once your project is completed, Gridley Company will compile all the operating and maintenance instructions related to your project in one easy-to-use volume.
Step 12: Two Year Warranty
While your project may be coming to a close, our relationship with you is not. We have built a successful firm by retaining clients for life and relying on them for referrals to family and friends. Our warranty is one way of ensuring complete client satisfaction.
Our projects are covered by a comprehensive two year warranty. There is no better warranty in the business and we will back it up with quick service whenever needed.
Briefly describe your contest
Design a graphic that deplicts our Client's Journey (Milestones) for their design & remodel!